Networking lab setup with UNetLab
Published on 2016-11-29UNetLab, short for Unified Networking Lab, is a Linux distribution that allows you to build your own networking labs. UNetLab can be seen as a hypervisor for images that are usually run on physical networking equipment or inside separate virtual machines. I wanted to incorporate setting up UNetLab in another article but decided to award the setup process with its own post.
UNetLab is an initiative by Andrea Dainese (@adainese) that’s meant to run the actual images of a Network Operating System (NOS), for example Cisco IOS or Juniper JunOS. UNetLab is an increasingly popular alternative to GNS3 (Graphical Network Simulator) that provides comparable functionality, or for something like Cisco Packet Tracer (which simulates instead of emulates, and supports only Cisco devices). UNetLab works as a virtual machine on top of any hypervisor by VMware (including the free VMware Player). You just run and configure the VM, upload the NOS image you want to use and connect to the web interface to start building your lab. Let’s get to it.
Running the virtual machine
We will be using the free VMware Player throughout this tutorial. You can also run UNetLab on an ESXi server if you have one available, which is actually the preferred method if you want to build bigger labs. I think you can even do a bare metal install. I’ve heard from people that provide the VM with 16 GB of RAM. For smaller labs you can get away with 4 GB. I have 16 GB in my desktop so I will be providing 8 GB to my VM. The first step is to grab VMware Player from the VMware website here and install it.
When you have VMware Player ready to go, grab the most recent build available from the UNetLab website here.I prefer the Google Drive option. At the moment of writing this, the version available for downloading is Unified Networking Lab-1.0.0-8.ova but we will be updating this later on to a more recent version.
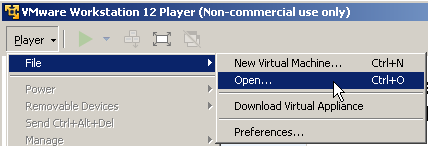
Run VMware Player and select Player -> File -> Open:
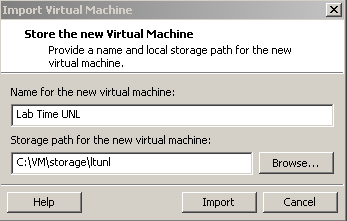
Select the OVA you grabbed from the UNL website and then name the VM and select a storage location, then click Import:
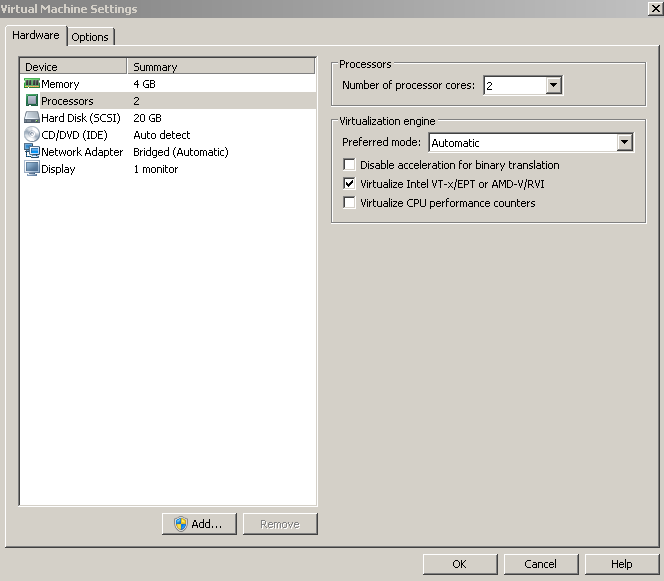
Accept the agreement then wait for the import to finish. After the import, right-click your new VM and select Settings. Here, provide as much RAM and CPU cores as you need. Make sure to select Processor and check the option that’s called “Virtualize Intel VT-x/EPT or AMD-V/RVI”. This option allows the VM to be a hypervisor itself which you will need later to run your networking software. For me the default NIC configuration was in bridge mode, which is what I want it to be.
Now power on the VM and wait for it to present the shell. The default credentials are root:unl. Once you log in you will be asked to do some basic setup including providing a new root password and some network settings. I just use DHCP in my own network. After providing the settings, the VM will reboot and provide a shell again. Log in with your new root password and test your network configuration. The UNetLab VM does not support the ifconfig command anymore so you can use ip a. The adapter pnet0 should have picked up an IP address from your DHCP server if everything went right. Test your connection to internet and your DNS server by pinging a web server via a domain name.
Setting up the VM
If everything went well, it’s time to do some household tasks in our fresh VM. First, we want to check the UNetLab version. If you use the command dpkg -l unetlab it will output some crap and the UNetLab version consistent with the filename of the OVA we downloaded:

Now, update the VM using the following commands:
apt-get update
apt-get -y install unetlab
This updates the software packages in the UNetLab Linux distro and does a reinstall of the most recent UNetLab version. When done, view the UNetLab version again:

If you want to run Cisco IOS images you need to setup UNetLab to handle the licensing right. There is a Python script on Github that really helps. Assuming you are in the home directory of the root user (/root), run the following command. Note that your VM has an SSH server so you can connect to it using SSH and copy the commands:
wget https://gist.githubusercontent.com/paalfe/8edd82f780c650ae2b4a/raw/bd7b6b8a81c338359e6de4ff0ed0def9f7dc9146/CiscoKeyGen.py
Now make the downloaded file executable and run it:
chmod +x CiscoKeyGen.py
./CiscoKeyGen.py
The keygen gives the following output:
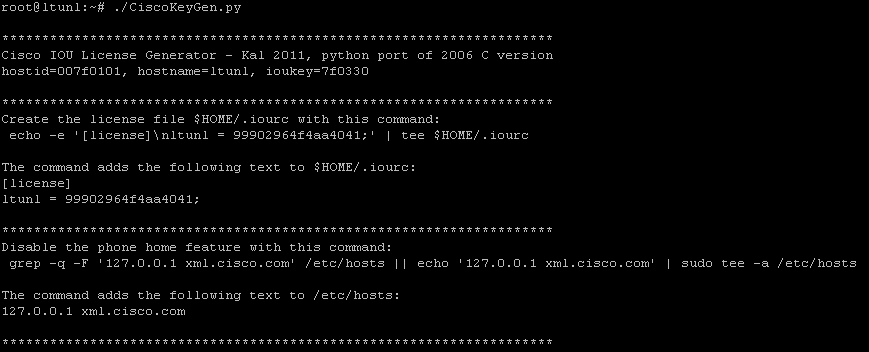
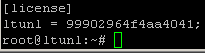
Under [license] it states your host name and a license key. Use this output to form the following commands customized for your VM, then run them:
echo [license] > /opt/unetlab/addons/iol/bin/iourc
echo "ltunl = 99902964f4aa4041;" >> /opt/unetlab/addons/iol/bin/iourc
cat /opt/unetlab/addons/iol/bin/iourc
The last command returns the output of the file you just created and should look something like this:
I like to use a cloud interface inside my UNetLab environment. It’s visualized as a cloud icon in your lab topology and connects your lab to a separate virtual NIC. I connect this vNIC as a bridge to my LAN. This allows me to reach any device inside UNetLab that has an interface connected to the cloud icon and configured with an address inside my LAN. This opens up possibilities like running scripts that talk to the UNetLab environment or testing monitoring software, for example.
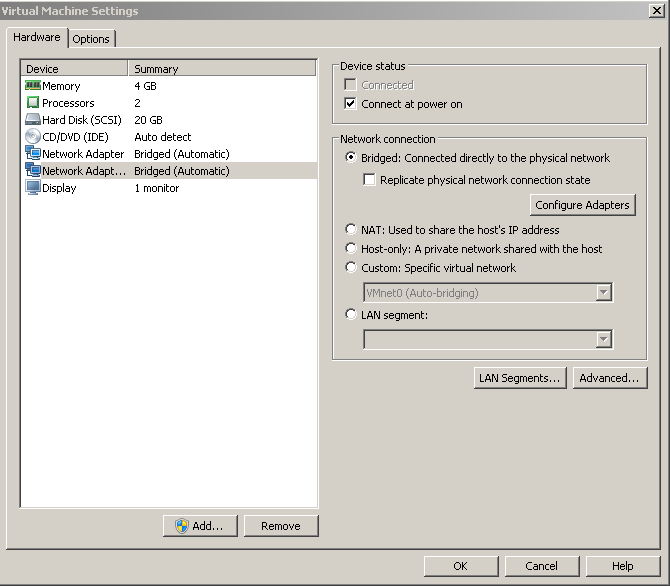
To install an extra vNIC for the cloud interface, power off the VM. I use the command poweroff. When the VM is powered off, open VMware Player again and go to the VM settings. Use the Add button to add another vNIC and make sure it’s configured in bridge mode:
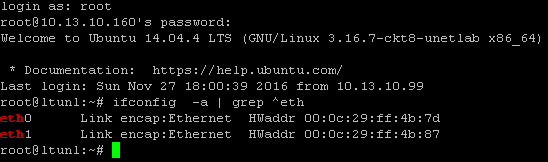
Power on the VM again. When it’s up, run this command:
ifconfig -a | grep ^eth
It will list the vNIC interfaces that the VM knows:
The file /etc/network/interfaces should look like this (I had to add the bridge_ageing 0 setting using the editor Vi):
root@ltunl:~# cat /etc/network/interfaces
# This file describes the network interfaces available on your system
# and how to activate them. For more information, see interfaces(5).

# The loopback network interface
auto lo
iface lo inet loopback

# The primary network interface
iface eth0 inet manual
auto pnet0
iface pnet0 inet dhcp
    bridge_ports eth0
    bridge_stp off
    bridge_ageing 0

# Cloud devices
iface eth1 inet manual
auto pnet1
iface pnet1 inet manual
    bridge_ports eth1
    bridge_stp off
    bridge_ageing 0

iface eth2 inet manual
auto pnet2
iface pnet2 inet manual
    bridge_ports eth2
    bridge_stp off
    bridge_ageing 0

iface eth3 inet manual
auto pnet3
iface pnet3 inet manual
    bridge_ports eth3
    bridge_stp off
    bridge_ageing 0

iface eth4 inet manual
auto pnet4
iface pnet4 inet manual
    bridge_ports eth4
    bridge_stp off
    bridge_ageing 0

iface eth5 inet manual
auto pnet5
iface pnet5 inet manual
    bridge_ports eth5
    bridge_stp off
    bridge_ageing 0

iface eth6 inet manual
auto pnet6
iface pnet6 inet manual
    bridge_ports eth6
    bridge_stp off
    bridge_ageing 0

iface eth7 inet manual
auto pnet7
iface pnet7 inet manual
    bridge_ports eth7
    bridge_stp off
    bridge_ageing 0

iface eth8 inet manual
auto pnet8
iface pnet8 inet manual
    bridge_ports eth8
    bridge_stp off
    bridge_ageing 0

iface eth9 inet manual
auto pnet9
iface pnet9 inet manual
    bridge_ports eth9
    bridge_stp off
    bridge_ageing 0
Now reboot the VM using the reboot command. When the VM is running again, use the command brctl show to show the bridge interfaces configured on the VM and their status:
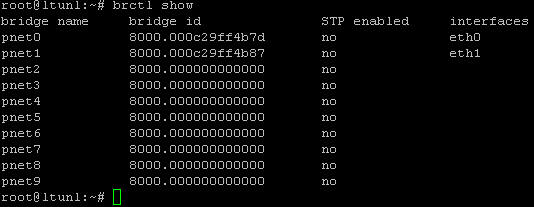
You now have configuration for 10 network interfaces in place, which is the VMware Player limit. Two of those interfaces are up and running.
Uploading images
The next step is to upload some software images that you want to use. UNetLab supports multiple image formats, like dynamips, iou and qemu. I am not familiar with the recent progress of the GNS3 project, but images that used to run on GNS3 well a couple of years ago are dynamips images and they work in UNetLab too. Qemu is cool because you can convert a lot of different generic x86 virtual machines to a qemu image. A lot of vendors release x86 VM versions of their products, including examples like Fortinet’s FortiGate VM or Juniper’s vMX router. You can find a list of images that UNetLab supports here.
I use FileZilla to make an SFTP connection to the UNetLab VM. SFTP is like FTP built into the SSH server. My settings look like this:
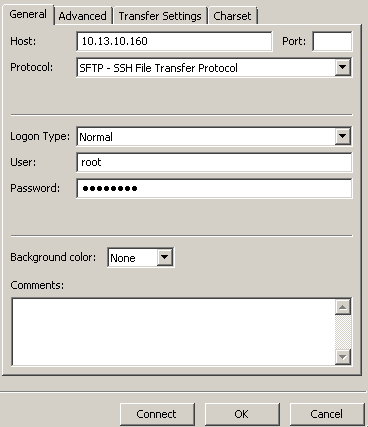
The folder /opt/unetlab/addons contains three folders for each of the supported image formats. I use a qemu image named vios-adventerprisek9-m-15.4-1.3.0-181 so I create a directory with exactly that name under /opt/unetlab/addons/qemu. In this directory I place my image file called hda.qcow2. I didn’t test it, but I think directory and file names are important here. After uploading images, run this command:
/opt/unetlab/wrappers/unl_wrapper -a fixpermissions
Building a lab
We are now ready to set up our client device and connect to the GUI. I used Windows and I don’t know about your options to run the GUI from other operating systems. We have to do a client integration. You can download the required file here. UNetLab uses two options to interface with your devices: telnet and VNC. Most people have Putty and UltraVNC installed for using UNetLab, I don’t know how other applications will react. The client integration file allows UNetLab to run the required applications by clicking on a running device in the topology. After the install, telnet via Putty should work. If you want to use VNC, you can find the required instructions on the UNetLab.com website here.
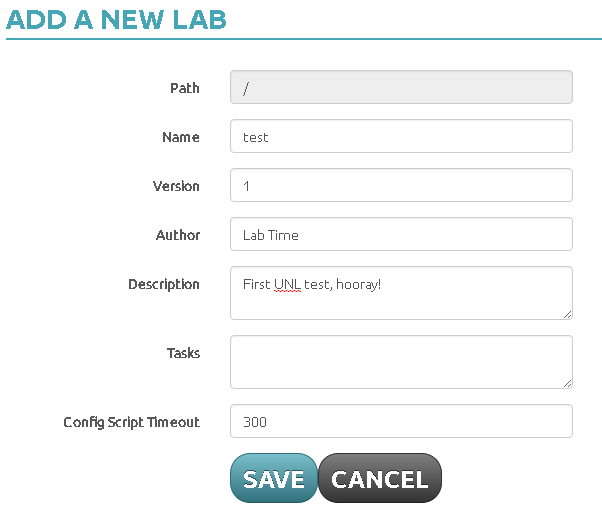
Point your browser to the IP address of your UNetLab VM. Accept the policy and log in with the default credentials admin:unl. Click Actions -> Add a new lab, then fill out the form:
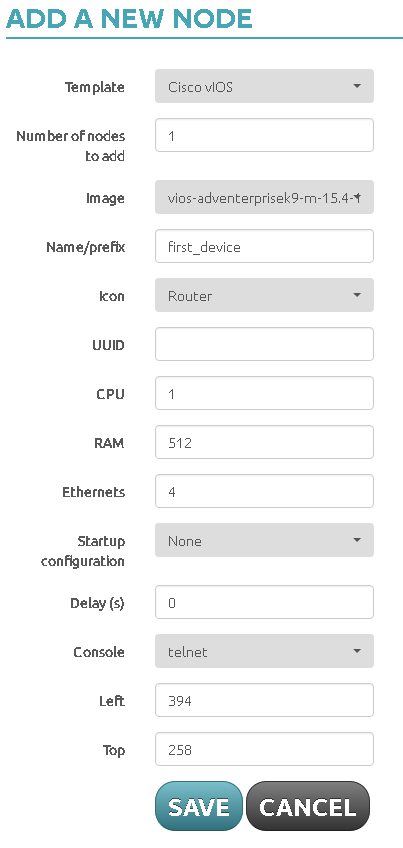
Double click on the new lab, then click the Open button. Click the + button to add a new node, select Node from the list, then click to place the new device on the topology. You will be asked to select a template. In this case we are using a Cisco vIOS image, so we will select that template and fill out the form:
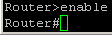
Right-click on the new device and select Start. After the device has started, you can click on it to automatically open a session to the device using Putty. Don’t worry if this is a slow process and you don’t have output in your session immediately. Within a couple of minutes, you will have a working session:
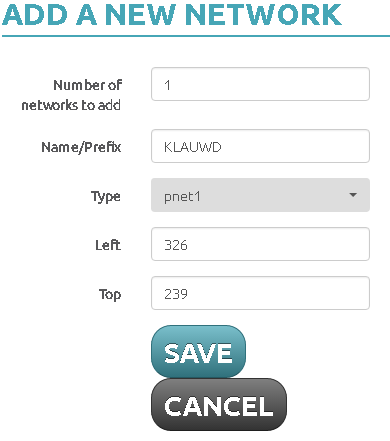
If you want to use the cloud interface, click the + button again and select Network from the list. Name the object and make sure to set the Type to one of the interfaces you have available, pnet1 in my case:
To connect a node to a cloud interface, make sure the device is powered off. Right click the device, then select Edit -> Interfaces. Click on one of the interfaces, then select the cloud interface:
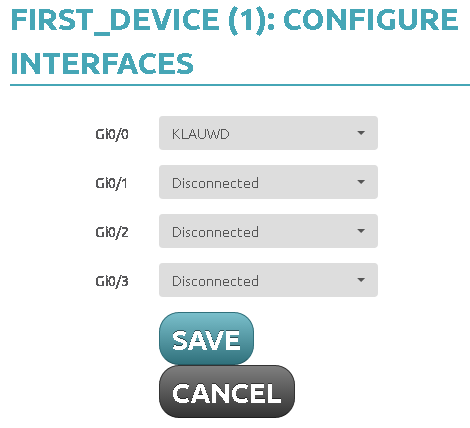
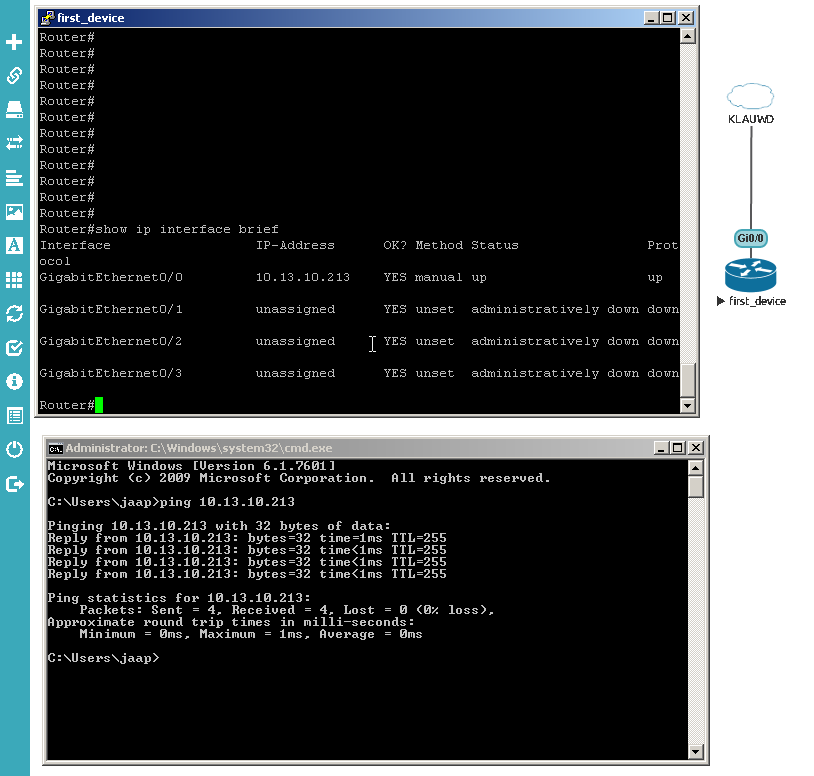
The device is now connected to your network via the bridge interface. If you configure the device interface with correct settings for your network you can reach it at this point:
So that’s it, you can build topologies and test your own stuff with this setup. I should mention that the developers of UNetLab have a new project coming up which is called Emulated Virtual Environment or EVE. One of the UNetLab developers, Uldis Dzerkals, has a donation page for the project online here. It includes a video where he explains all the cool new features. If you’d like more information about the UNetLab project and where these guys are coming from, you can check out the Packet Pushers podcast where both Andrea and Uldis are interviewed. Thanks for reading a Conproly article. Please reach out on social media if you have any questions of comments.