Notes on NetScaler connectivity
Published on 2017-04-12I’ve had to do some work on Citrix NetScaler boxes lately and I’ve discovered a couple of things that are worth elaborating on. NetScalers are very specific about how they use their interfaces and IP addresses and that takes some getting used to. There are also a couple of pitfalls.
This article is kicked off with a short bit of theory and once that’s out of the way we will of course have a lab setup to demonstrate some NetScaler behaviour.
Background info
The NetScaler product is a so-called ADC which stands for Application Delivery Controller. This market segment was traditionally filled with load balancers which is basically still what ADCs are, only with a lot of extra features packed in. One of the most obvious added features is the reverse proxy function. ADCs are placed somewhere in the path of your traffic flow from client to server. They often provide some security services as well and for that reason there is usually some kind of DMZ construction involved.
NetScalers have different categories of IP addresses:
- NSIP: The NSIP is the NetScaler IP address. The NSIP is the IP you connect to for management, for example via HTTPS or SSH. This IP gets configured during the setup of the NetScaler and by default it’s also used to source some additional kinds of traffic to back-end servers from.
- SNIP: The SNIP is the subnet IP address. The SNIP is used for sourcing traffic in subnets that the NetScaler is directly connected to and it’s used for connection management and server monitoring. Having a SNIP is not mandatory.
- VIP: A VIP is a Virtual IP address. VIP’s are used for services configured on the NetScaler. If you set your NetScaler up as a load balancer or authentication server for some kind of service in the back-end, you will have a VIP for the services that the NetScaler should answer for. The VIP is the address that your clients will connect to. You can have multiple VIP’s to make multiple services available or, in a reverse proxy scenario, you can use a single VIP for that feature and then look at request headers to determine specific back-end services.
- MIP: A MIP is a Mapped IP address. You will use a MIP in certain scenario’s when a SNIP is not available or not applicable. I haven’t been in any situation where I’ve needed a MIP myself.
The explanation above is just a summary. Once you start configuring specific services you should look up exactly which IP gets used for which service. An example of this is that by default the NSIP gets used to source RADIUS requests to your back-end. However, if you configure load balancing, a SNIP will likely be used so make sure to get those details right. Depending on your specific configuration and topology this has more impact than might be obvious at the start. Firewalls and back-end servers have to allow connections from the specific IP that’s being used.
The main gripe I have with NetScalers is that they don’t bind IP addresses to interfaces. This is what motivated me to write this article in the first place. As an example, consider a NetScaler with two interfaces. If I give the NetScaler a NSIP of 192.168.60.100 corresponding with the subnet that’s used in the broadcast domain of interface one, it will also listen to this IP address on interface two. This poses a threat in certain situations. Consider the following scenario:
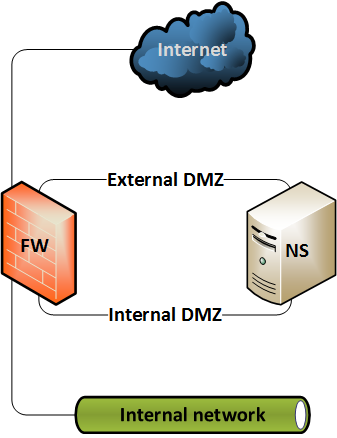
This setup is not uncommon with NetScalers providing reverse proxy services or remote access to a Citrix environment. One or two firewalls can be used to create separate zones for an external and an internal DMZ. The firewall controls access to the zones. It should allow clients to only access the interface in the external DMZ. The policy for the internal DMZ is different and allows communication between the NetScaler and the required servers on an internal network.
The risk is that the external DMZ might host more systems besides the NetScaler. By default, the NetScaler listens to its NSIP in the external DMZ too because its IP addresses are not bound to a specific interface. If one of the systems in the external DMZ is compromised, then it can be misused to get into the NetScaler via its management address. If you host your NetScaler on a modern platform then you might mitigate this with microsegmentation. If your switches provide the option you can use something like PVLAN, but that is a problem if you have a virtual NetScaler. All in all, these mitigations are not perfect. You can however use ACLs that can be bound to an interface and ensure the NetScaler doesn’t listen to the wrong addresses on the wrong interface. The lab part of this article has a demonstration of this scenario, including the mitigation with ACLs.
Obtaining lab software
Citrix provides two tastes of NetScaler. They have the SDX for their physical appliance and the VPX for their virtual appliance. They didn’t send me any physical stuff to play with (I’ll admit that I havent asked them) but they do provide a couple of other options to try things out. The most obvious one is looking for a trial, you’ll find this page. Walk through the instructions, create an account and you can download a VPX VM for a platform of your choice and have a 90 day trial license e-mailed to you. If you go this route, you will be directed to a download link for a VPX 10.5 which is a bit old. After creating the account, I’ve clicked through the portal a bit and noticed I am also able to download a VPX Express version 11.0 right here. The page says you’re downloading 11.1 but you’ll get 11.0. VPX Express is a low throughput trial edition. If this is not enough for your testing purposes you can request a 90 day evaluation for the full edition with a platinum license. For the requirements of my lab demonstration, I’ll use my trial license with the VPX Express 11.0 version. VPX 12.0 is on the verge of being released if you’re curious, but I don’t know about your trial options with that one yet.
Configuring the license is a bit of a hassle. You have to go to the license management part of the portal (the link is e-mailed with the trial key itself), put the interface MAC address in there somewhere and generate a license file that you can then upload to the NetScaler. It has to do a reboot afterwards.
Once you’re up and running and have the license in place, you can finally start building your lab.
Lab Time
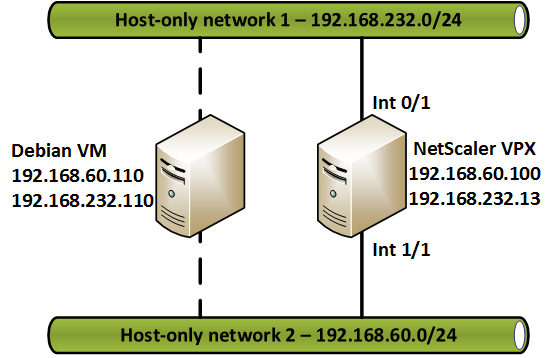
My lab will use VMware Player because it’s free. I want to demonstrate the dual interface scenario so I’ve had to hack VMware Player a bit to create a second host-only network. The details of that are for a future article. I’ve ended up with a setup something like this:
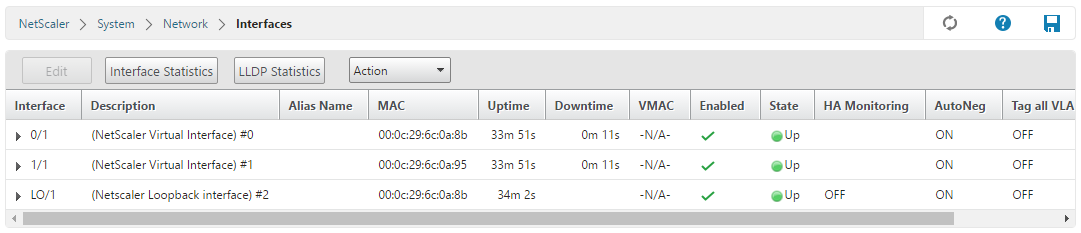
My VM is provided with two interfaces. They are recognized by the NetScaler OS and up and running:
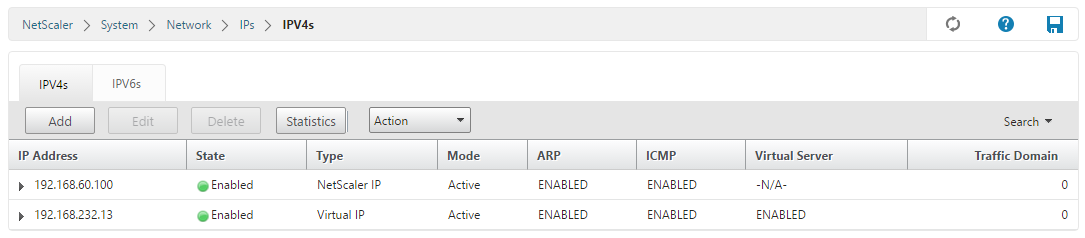
I’ve configured a VIP that does nothing and is down, but it is still pingable. I wanted to have an IP that needs to be in the external DMZ broadcast domain for demonstration purposes:

The NetScaler has recognized both IP’s, so we now have one NSIP and one VIP:
Both IP’s are reachable from both broadcast domains as I will demonstrate with the Debian box by switching its vNIC between the networks and providing a corresponding IP address. This is the result of pinging the NSIP with the Debian box from the internal DMZ broadcast domain. I don’t care about the VIP at this moment:

Now we switch the vNIC of the Debian box to the other host-only network. This is the result of pinging the NSIP with the Debian box from the external DMZ broadcast domain:

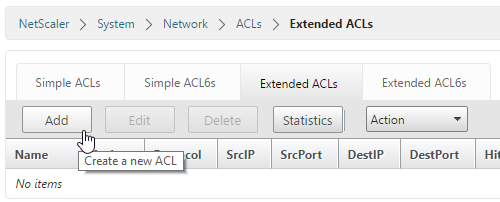
We don’t want the interface in the external DMZ to respond to the NSIP. We can solve it by configuring ACLs. I’ve found the Extended ACLs to be useful for that. Go to System -> Network -> ACLs and then the tab Extended ACLs, then click the Add button:
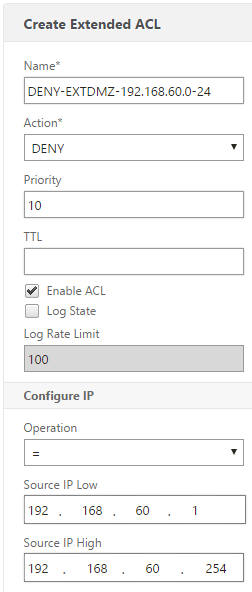
Give the ACL a name and set the operation and IP range. Be sure to bind the ACL to an interface at the bottom, then click create:
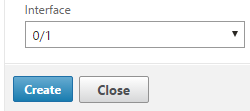
The ACL is now created but not yet applied. Select it, then click Action -> Apply. The ACL is now applied and active:
We can now still ping the NSIP from the host-only network with interface 2 in it:

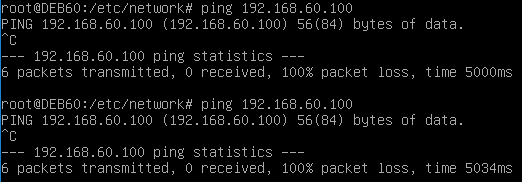
If we locate the Debian box on the host-only network with interface 1 in it, the NSIP has become unreachable:
The VIP is still reachable from both broadcast domains but that’s alright at this point:


Notice that we have only restricted a single subnet in the ACL. IP’s outside of this subnet should be restricted in the firewall that segmented the DMZ networks and the rest of the networks. With that we have reached the end of this demonstration and the end of this article. Thank you for reading yet another Conproly article. Please feel free to reach out on social media if you have any questions of comments.