Persistent changes to machines in Eve-NG
Published on 2018-01-07When using Eve-NG, most x86-based virtualization happens via Qemu. You place a so-called base image in your Eve-NG machine and that image gets used by all of your nodes. Active nodes exist as a linked clone of the base image. I ran into the need to make some persistent changes to a base image. I did not want to set up another machine just to adjust my images so I figured out how to use my Eve-NG machine to do it. Read on to find out how.
My use case was to adjust a Juniper vMX image (14.1R4.8). This image needed two adjustments to work in my lab. The first change was editing the /boot/loader.conf file to make the vMX machine use the built-in PFE. This is a workaround to avoid the need to run a second machine for each node, just for the PFE function. Juniper’s vMX 14.1R4.8 is a pre-release of the vMX and is the latest version able to work with a built-in PFE. The second change needed was setting the system root-authentication password, a requirement for succesful committing of changed configuration of the vMX.
I started with the image /root/junos/jinstall-vmx-14.1R4.8-domestic.img and used the following command to inspect it:
qemu-img info jinstall-vmx-14.1R4.8-domestic.img
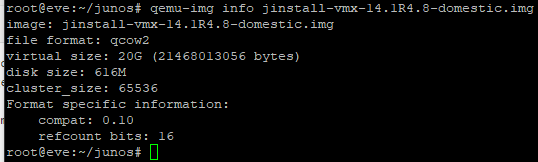
Luckily, it turns out this image is already in the qcow2 format. That means preparing it for usage in Eve-NG is as simple as this:
mkdir /opt/unetlab/addons/qemu/vmx-14.1R4.8
cp /root/junos/jinstall-vmx-14.1R4.8-domestic.img /opt/unetlab/addons/qemu/vmx-14.1R4.8/hda.qcow2
/opt/unetlab/wrappers/unl_wrapper -a fixpermissions
As soon as you added a vMX node in a lab, selected this image and started it for the first time, Eve-NG creates a linked clone of the base image you selected. You can find the linked clone for your node in a location similar to this:
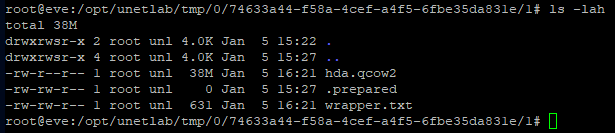
The first 0 in the path is the number of the user that built the lab containing the machine. In my case, I just use the default admin account for everyting and its number is 0. The long number is some identifier that I don’t know the purpose of. The 1 after that is the number of the machine. I have the directories 1 and 2 right now, because I have built 1 lab containing two nodes. Inside the directory for each machine is the image for the linked clone, named hda.qcow2.
To get my vMX prepared for building lots of labs, I poked it in the following ways. First, I appended the following line to /boot/loader.conf to get the machines' local PFE running after the next reboot. This was done directly after connecting to the node with Eve-NG’s interface via Putty, which means from the vMX’s native FreeBSD shell as root:
echo vm_local_rpio="1" >> /boot/loader.conf
I also had to make sure commits would be working. For this, I entered the CLI mode by typing “cli” from the FreeBSD shell. From config mode I used the following command and provided a password after that:
set system root-authentication plain-text-password
The problem I had is that this node was now fixed, but any new node would require the same tasks and the reboot, way too annoying. The changes I made on my first node are executed only in the linked clone file located in the node directory. I was thinking it should be possible to merge my changes back to the original image. This started me on a Google search without any direction. My first idea was that it should be possible to do some VM stuff with KVM. There is a CLI tool named virsh for this, but it was missing in my Eve-NG appliance. Crap, I didn’t want to do a lot of Linux/KVM learning right now, I just wanted to build Juniper labs.
Luckily, I stumbled on an official Eve-NG how-to describing how to create a Linux image by performing an Ubuntu install and copying the result to a qcow2 disk (here). The how-to gave me some more direction. Next, I found someone on StackOverflow asking how to consolidate changes in qemu snapshots back to the base image (here). I figured the behaviour in my linked clone setup might respond good to this and it worked! Note that the linked clone files I’m talking about might actually be snapshots too, maybe I’m just mixing up the proper names and implementation details.
Here’s what I ended up doing:
- 1: Place the default vMX image in the proper directory with hda.qcow2 as the file name
- 2: Build a lab, fire up a node, do the customizations
- 3: Execute the command “shutdown -p now” from the FreeBSD shell of the node
- 4: Stop the node from the Eve-NG GUI
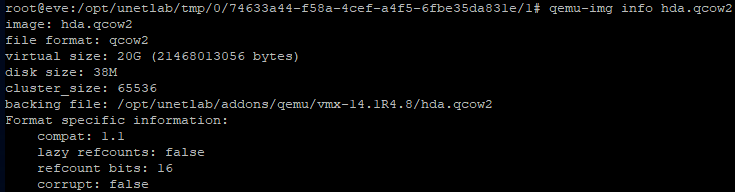
- 5: Inspect the snapshot file of the node, this allows you to verify the base image that’s being used in a linked clone/snapshot:
qemu-img info /opt/unetlab/tmp/0/74633a44-f58a-4cef-a4f5-6fbe35da831e/1/hda.qcow2
- 6: Create a new base image that will contain the changes made:
cp /opt/unetlab/addons/qemu/vmx-14.1R4.8/hda.qcow2 /root/junos/jinstall-vmx-14.1R4.8-domestic-modified.qcow2 - 7: “Rebase” the running snapshot containing the modifications to the new base image file:
qemu-img rebase -b /root/junos/jinstall-vmx-14.1R4.8-domestic-modified.qcow2 /opt/unetlab/tmp/0/74633a44-f58a-4cef-a4f5-6fbe35da831e/1/hda.qcow2 - 8: Now commit the changes that are contained in the tmp hda.cqow2 file back to the new base image:
qemu-img commit /opt/unetlab/tmp/0/74633a44-f58a-4cef-a4f5-6fbe35da831e/1/hda.qcow2 - 9: Remove the node from the lab to remove the nodes' temporary directory from Eve-NG
- 10: Place the new image in Eve-NG’s qemu directory:
cp /root/junos/jinstall-vmx-14.1R4.8-domestic-modified.qcow2 /opt/unetlab/addons/qemu/vmx-14.1R4.8/hda.qcow2 - 11: Run the wrapper command again:
/opt/unetlab/wrappers/unl_wrapper -a fixpermissions - 12: Build a new lab, create a node and use your new image!
The whole process is actually pretty straightforward once you have the right info. In this case with the vMX and its local PFE I have to wait one or two minutes after the node is booted before all the “ge” interfaces show up under “show interfaces terse”. I figure this has something to do with the PFE taking its time to get set up. The result of this experiment makes my happy as I can now build a lot of the Juniper labs I have in mind. I like that I can use my Eve-NG environment to customize the machines that I want to run.