ZFS backups on Proxmox with ZnapZend
Published on 2018-06-30I found a nice tool for managing snapshots and replication of ZFS datasets. I needed something like this for my Proxmox server. Getting ZnapZend to play nice with a fresh Proxmox box is a bit of a pain, so read on to learn how to do it.
Why choose ZnapZend?
I did some reading about tools that can manage ZFS snapshots and backups on a Linux host. ZnapZend sticks out because it supports managing snapshots and their age for multiple datasets and can also manage the replication to both local and remote ZFS backup targets. On top of that, it has mbuffer support built in. Mbuffer flattens the bursty nature of ZFS replication for an increase in throughput compared to more conventional tools that don’t use a buffer. ZnapZend seems to have everything covered. The official documentation can be found here on GitHub.
Besides ZnapZend, there are some other tools I’ve looked at. Since most tools available are not all-in-one like ZnapZend, I’ve structured them by purpose:
- Sanoid / Syncoid: Sanoid is an application that can manage your schedules of snapshots and backups based on policy. Syncoid is the part of the software that provides the replication capability and can be used stand-alone if necessary
- Snapshot tools
- Sanoid: See above
- zfSnap: zfSnap also seems popular for managing your ZFS snapshots and I’ve considered using it too
- zfs-auto-snapshot: zfs-auto-snap is part of the ZFS on Linux project and as such it counts as the default tool. It looks like it could do the job too
- Replication tools
- borgbackup: borgbackup is a replication script that can use SSH to sync a source dataset to a destination dataset, providing deduplication for the destination. The deduplication part is better suited for an archiving system that does not make use of filesystem snapshots
- PVE-zsync: PVE-zsync is a replication function that’s built in to Proxmox. It’s main feature is to do per VM snapshot replication, not an exact fit for my use case
- Syncoid: See above
If ZnapZend didn’t turn out to fulfill my needs, here is the link to a setup what would have been my second choice. This solution combines Syncoid with zfs-auto-znapshot and monit. Time to see how this stuff actually works.
What are we storing and how do we do it?
I am using a Proxmox server for this. Proxmox is a Linux-based alternative to VMware for some use cases, and it’s built on Debian. Proxmox comes with everything you need to start using ZFS, making use of the ZFS on Linux library. For this setup I am using 2 spare 1 TB disks that can be tested with. They contain a ZFS pool that mirrors the disks. The pool is called temp-disks and is mounted in /temp-disks. The pool contains a dataset named storage, mounted in /temp-disks/storage. This mount point will contain general file based data in the future. I want to protect the data in this dataset using a combination of ZFS snapshots and replication.
Installing ZnapZend on Proxmox
There is no up to date Debian package for ZnapZend, which means that the only option is to build the software yourself. Proxmox does not come with compilers out of the box and is also missing some other dependencies. We have to prepare the environment first, then download and build the ZnapZend software, to finish it off with setting up the environment and performing the configuration.
From the CLI of your Proxmox box, run the following command to install the dependencies:
apt-get install perl unzip git mbuffer build-essential
Now download, extract and configure the ZnapZend software to prepare for the installation:
cd /root
git clone https://github.com/oetiker/znapzend
cd /root/znapzend
./configure --prefix=/opt/znapzend
If the preceding steps succeed, we can now make and install ZnapZend:
make
make install
I don’t have a lot of experience with compiling software on Linux, so I found the output of the make commands difficult to interpret. It turns out these steps result in a successful install of ZnapZend. The main binaries you will interact with are now located here:
/opt/znapzend/bin/znapzend/opt/znapzend/bin/znapzendzetup/opt/znapzend/bin/znapzendztatz
If you want to be able to run these commands from your shell you should link them into /usr/local/bin:
ln -s /opt/znapzend/bin/znapzend /usr/local/bin/znapzend
ln -s /opt/znapzend/bin/znapzendzetup /usr/local/bin/znapzendzetup
ln -s /opt/znapzend/bin/znapzendztatz /usr/local/bin/znapzendztatz
You can now run static ZnapZend commands. Try out the following to see if your software actually installed correctly and gives you a result:
znapzend --version

Configuring ZnapZend
Before ZnapZend can do anything more than displaying its version, a backup/snapshot plan needs to be configured. The configuration gets stored with each dataset. The best practice is to be as granular as possible and only use ZnapZend for the deepest datasets, not for datasets or pools containing other datasets. The easiest configuration creates only local snapshots with no replication. The example I used for testing looks like this:
znapzendzetup create --recursive \
--mbuffer=/usr/bin/mbuffer \
--mbuffersize=1G \
--tsformat='%Y-%m-%d-%H%M%S' \
SRC '30min=>1min' temp-disks/storage
The example schedule above creates a new snapshot every minute (“1min”) and keeps 30 minutes worth of them (“30min”). I had to modify the path to the mbuffer binary for the Debian sytem, the default was pointing to /opt, breaking some other things that get discussed later on. With a schedule (ZnapZend calls it a plan) in place for at least one dataset, ZnapZend can be called to test the validity of the schedule you just configured:
znapzend --debug --noaction --runonce=temp-disks/storage
If successful, this command creates some test output simulating a run of the ZnapZend configuration. You can view the configured plans using this command:
znapzendzetup list
Deleting the plan for a dataset can be done with the following command. Make sure to get the name of the dataset right, with no preceding “/":
znapzendzetup delete temp-disks/storage
The next step is to configure the system to use ZnapZend as a service. Debian uses systemd, so the following procedure (found here) applies. Copy the sample configuration for systemd from the ZnapZend code to the systemd directoy:
cp /root/znapzend/init/znapzend.service /etc/systemd/system/znapzend.service
Edit /etc/systemd/system/znapzend.service to look like this:
[Unit]
Description=ZnapZend - ZFS Backup System
Documentation=man:znapzend
After=zfs-import-cache.service
After=zfs-import-scan.service

[Service]
EnvironmentFile=-/etc/default/znapzend
ExecStart=/opt/znapzend/bin/znapzend --logto=/var/log/znapzend.log
ExecReload=/bin/kill -HUP /var/run/znapzend.pid
Restart=on-failure
# might be neccessary on low power systems
# Nice=19
# IOSchedulingClass=2
# IOSchedulingPriority=7

[Install]
WantedBy=multi-user.target
The pid location and the ExecStart path are tailored to our Proxmox environment in the preceding example code. Now enable the ZnapZend service, start it and check out the status:
systemctl enable znapzend.service
systemctl start znapzend.service
systemctl status znapzend.service
If everything went well so far, the status output should include this:

If you change the configuration while the ZnapZend daemon is already running, the daemon needs to reload its configuration, so run the following command:
pkill -HUP znapzend
Working with snapshots
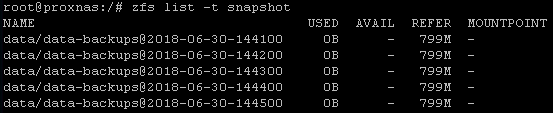
At this point you should have ZnapZend fully functional. Just leave it running for a few minutes then have a look at your snapshots:
zfs list -t snapshot

As you can see, we’ve got a bunch snapshots available just like we configured. ZnapZend automatically deletes the older snapshots. I have added and changed some data in between some of the snapshots. Those snapshots are larger in size to store the differences.
When you need access to the contents of a snapshot, any snapshot can easily be accessed like this:
cd /temp-disks/storage/.zfs/snapshot/<snapshot-name>
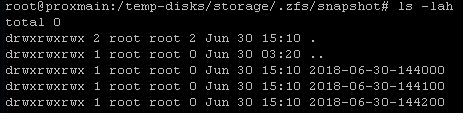
The snapshots are stored in a hidden .zfs subfolder in the root of the mount point of our dataset. Snapshots should not be removed by using the regular Linux commands. Instead, use the ZFS CLI. Just copy the name of a snapshot from the snapshot list, like this:
zfs destroy temp-disks/storage@2018-06-30-144200
Working with backups
The snapshot feature is cool to provide a history of your filesystem, but if something goes wrong with the ZFS pool it’s located on you still lose everything. ZnapZend can manage replication of the filesystem to another ZFS dataset even on another host. For my test setup I am using a second spare system, also containing 2x1 TB for a ZFS mirror. On this box, my ZFS pool is called data, containing a dataset named data-backups, mounted as /data/data-backups. The second box needs to have ZnapZend installed too. Keep the version the same on both systems, as major updates can break compatibility of its functions. The same installation procedure as for the first server can be used but you don’t need to provide schedules or daemonize ZnapZend (installing it into systemd) on the second server.
The replication uses SSH. This requires passwordless SSH login from the source system to the target system. I’m using two Proxmox servers for this so I’m lucky: connecting both servers into the same cluster automatically provides this capability between the cluster nodes. If you don’t have this luxury, you need to manually set up SSH public key login.
For the replication test, I adjusted the ZnapZend plan for temp-disks/storage. First, we should delete the old plan:
znapzendzetup delete temp-disks/storage
Now you can add the new plan, with just one additional line:
znapzendzetup create --recursive \
--mbuffer=/usr/bin/mbuffer \
--mbuffersize=1G \
--tsformat='%Y-%m-%d-%H%M%S' \
SRC '30min=>1min' temp-disks/storage \
DST:a '30min=>1min' root@<IP>:data/data-backups
Run the pkill command again to kick the new configuration into place the wait a few minutes. After this, check out the ZFS snapshots on the target host:
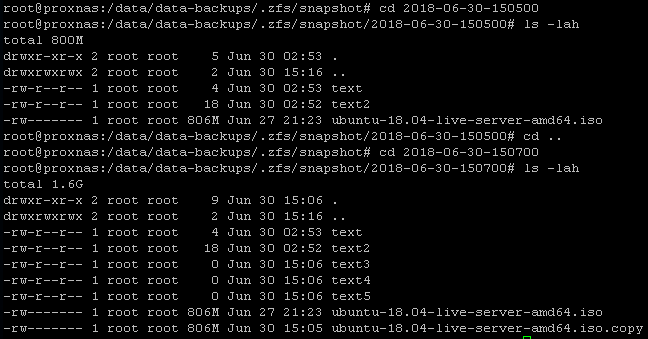
Note that I’ve made some changes to the filesystem between snapshots 2018-06-30-150500 and 2018-06-30-150700 in the last screenshot. This demonstrates how you can easily access different historic points in time for the dataset.
Conclusion
ZnapZend is a pretty powerful tool to manage your ZFS snapshots and replication. I think setting up ZnapZend is too prohibitive for some users, but once you get it done you are rewarded with a nice tool that’s easy to use. I especially like the way you can access the snapshot contents directly in the same mount point as the dataset. You can make use of anything from a yearly snapshot to a snapshot per minute and decide how long each snapshot gets stored. One thing my setup is still missing is some kind of notification or monitoring. I’d like to have a daily or weekly e-mail letting me know about the status of my snapshots and replication. If I figure something out I’ll document it on Conproly.