Running HAProxy and Let's Encrypt on Docker
Published on 2018-09-20I had to migrate my reverse proxy away from the PfSense package to a standalone solution. One requirement was having automated certificates from Let’s Encrypt. Manually setting up all kinds of Linux applications will become tedious, so once again we’re looking at leveraging Docker to simplify operations.
The PfSense package for HAProxy has kept me reasonably happy until it didn’t. The package is brilliant for quickly getting a reverse proxy running including SSL offloading with Let’s Encrypt integration. Sadly, some specific requirements made it too annoying to rely on the GUI to manipulate the haproxy.cfg configuration file. Now, I run a separate HAProxy VM in a DMZ. The DMZ doesn’t matter too much for a small lab network but why not make this design choice if I’m running everything virtualized anyway?
Because we don’t want to be fiddling with too much software maintenance for everything we need to run, Docker can be used to run readily deployable images. In my setup, I’m using a fresh Debian VM as the Docker host (Debian 9.5 as we speak), and two Docker images straight from Docker Hub. The first image I used is the standard HAProxy image. The second image is the official Certbot image. Certbot is one of the available software implementations that can talk to the Let’s Encrypt infrastructure and grab SSL certificates for you.
The way all this had to be tied together is different from what I’ve encountered so far. Some of the things I ran into took a lot of time to figure out, so it’s probably worth documenting them as a full story here. Basically I needed a VM that does reverse proxying and SSL offloading for me. Behind the reverse proxy are HTTP, HTTPS and SSH based services. The SSH requirement was too annoying to get right in the PfSense GUI. Some other stuff felt needlessly complex. I also wasn’t able to get certificates for different domains properly integrated with Let’s Encrypt using the PfSense GUI. Fast forward to my new setup.
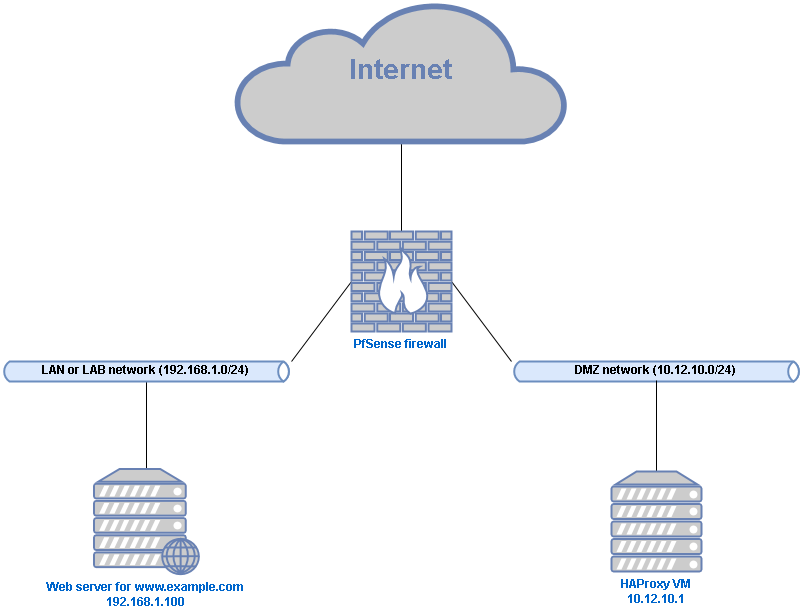
The HAProxy VM sits in a DMZ VLAN connected only to a separate interface on the PfSense firewall. The firewall does not allow connections out of the DMZ network to any other local networks, except for the required HTTP, HTTPS and SSH connections to the servers that the reverse proxy will provide access to. Devices within the DMZ are allowed to make any outbound connections. Inbound connections to the DMZ are only allowed for the specified services, in this case again only HTTP, HTTPS and SSH.
I’ve set my local DNS server (also the PfSense box) to override records for all domains serviced by the reverse proxy. On the internet, these records all point to the WAN interface address of the firewall. Because of this, you’ll need NAT port forwarding rules in PfSense for any service that needs to be passed through to the reverse proxy. I had to change the local HTTPS and SSH ports of my PfSense box to something else just so that PfSense can listen on these ports on the WAN interface and then translate them to reach the local IP of the HAProxy VM. So in summary, local DNS points connections to any of the domains straight to the local IP of the HAProxy VM in the DMZ. DNS on the internet points to the outside of PfSense, where these connections get NAT’ed to the HAProxy VM.
Now that we know what we want of the HAProxy VM, all that’s left is figuring out how to build it. Like I said, Docker will be used. Docker containers have a local network with local IP’s that you don’t necessarily need (or want) to control manually for most use cases. Besides the local network, outside connections get NAT’ed on the IP of the Docker host to reach the rest of the network. This works well by default for outbound connections, but for inbound connections you need to bind the port for the IP of the Docker host to the container. This also means that the port is now used by the container and is no longer available for other containers, or for the host itself. In this case, ports 22, 80 and 443 need to be bound to the HAProxy container. That means changing the SSH IP on the Docker host to something else.
The documentation for the official HAProxy image on Docker Hub instructs you to build your own container based on their image. In the Dockerfile (that gets used to specify build details for containers) in those instructions, the only thing that’s being done is copying a local (on the host) haproxy.cfg file into the newly build container. I prefer to skip this extra step, using a bind mount to the local filesystem instead (on the host), mapping a directory into the container and providing the haproxy.cfg file in this way. Like that, there’s no need to build your own container, you can just run one straigt from Docker Hub. Here’s the command I use to do that:
docker run --detach \
    --publish 22:22 \
    --publish 80:80 \
    --publish 443:443 \
    --name proxycont \
    --restart always \
    --volume /srv/haproxy/cfg:/usr/local/etc/haproxy:ro \
    --volume /certs:/certs:ro \
    haproxy:1.7
Breaking this down:
- The container gets run in detached mode (
--detach) so it gets started in the background - The ports 22, 80 and 443 get published (
--publish) or bound from the local IP of the Docker host to the container - The container name (
--name) gets set to “proxycont” - The container gets started automatically (
--restart always) if it exits or if Docker restarts - Two local directories get bound into the container:
/srv/haproxy/cfgon the Docker host gets mapped to/usr/local/etc/haproxywithin the container, where the container expects the haproxy.cfg configuration file to be when it’s started. The container can only read the file, not manipulate it, thanks to the:rodirective./certson the Docker host gets mapped to/certswithin the container, again as read-only - Finally, the specific image from Docker Hub is given. For services that I don’t want to go down, I prefer to specify a version, otherwise Docker will grab the latest image by default. If there is a major upgrade (for example moving from 1.7 to 1.8) you can not be sure that your current configuration and setup will keep working properly. The new container might not even start. So, we’ll stick with 1.7 for a while until we consciously decide to roll out newer software
HAProxy (and thus the HAProxy container) needs a valid configuration file to be able to start. If you plan to use SSL certificates to have HAProxy perform SSL offloading, you might be tempted to configure HAProxy for HTTPS immediately. I advise to start with a simpler, no-HTTPS configuration so you don’t need the SSL certs immediately just to start the container. If you want to configure for SSL straight away, use self-signed certificates and place them in the certs directory that’s bound to the container. Here is a simplified example config to get started:
global
    maxconn 4000
    tune.ssl.default-dh-param 2048

frontend http
    bind *:80
    mode http

    default_backend http-server
    timeout client 1h

backend http-server
    mode http
    server web01 192.168.1.100:80
    timeout connect 1h
    timeout server 1h
The global section has some basic stuff that makes HAProxy complain less in logs and is generally just smart to have. Then there’s a frontend section defining a listener that gets bound to port 80. Besides some other settings, it refers to a default backend named http-server. The backend section for http-server then specifies where to find that server and the server name. Running just this configuration will give you a working reverse proxy. When we got started, this is not quite yet what we aimed to accomplish. Let’s look at obtaining some free SSL certificates.
Let’s Encrypt is a popular provider of free SSL certificates. They are relatively easy to work with but a bit tough to get started on. The rough idea of Let’s Encrypt is that you run a piece of software that validates your ownership of the domain that you’re requesting a certificate for. Upon successful validation of your ownership, you will be provided with an SSL certificate that’s good for the next three months by default. You should automate obtaining and implementing new certificates to keep receiving valid, up-to-date certificates without having to maintain them. You won’t have to perform manual certificate requests anymore before the current certs expire.
Let’s Encrypt can validate domain ownership in multiple ways. One neat way is to use the API of your domain provider (some larges ones like AWS and CloudFlare offer this feature). You can just put the API key into the Let’s Encrypt software implementation of your choice and be ready to receive your certificates. The PfSense package offered this feature, I tested it with CloudFlare and it works very good. For our HAProxy setup with Docker however, setting this up is too much hassle. Instead, we are going to have Certbot temporarily host the directory /.well-known/acme-challenge/ in the root of the domain we’re requesting a cert for. The hosting feature comes built-in with the Certbot Docker container. The way this works is that if you’re the owner of a domain, then you can host stuff at the IP' that that domain’s DNS records point to. Let’s Encrypt looks for a generated code in the well-known path.
The Certbot container is usually run using the --rm parameter. This means that the container only exists while running the requested operation, and gets immediately destroyed right after. The first challenge we encounter is the fact that the HAProxy container is already listening on port 80. We have to run the Certbot container on a different port, and then have HAProxy redirect connections to Certbot, but only for connections requesting content from the well-known path. Our HAProxy configuration grows:
global
    maxconn 4000
    tune.ssl.default-dh-param 2048

frontend http
    bind *:80
    mode http

    acl letsencrypt-acl path_beg -i /.well-known/acme-challenge/
    use_backend letsencrypt if letsencrypt-acl

    default_backend http-server
    timeout client 1h

backend letsencrypt
    mode http
    server letsencrypt 10.12.10.1:8888
    timeout connect 1h
    timeout server 1h

backend http-server
    mode http
    server web01 192.168.1.100:80
    timeout connect 1h
    timeout server 1h
The new configuration uses an ACL to match requests for paths beginning with /.well-known/acme-challenge/ and then redirects any connection matching the ACL to a different backend. The added backend in my example points to 10.12.10.1:8888. This IP is the local IP of the Docker host and 8888 is the port that the Certbot container is going to listen on. This port is published or bound from the host to the container just like we’ve seen before. Doing it this way is sort of a non-scalable hack but it works perfectly for my use case so I don’t care. This is the easiest way I could think of to make both containers communicate.
With the required HAProxy configuration in place, we can now run the Certbot container and hopefully receive a valid certificate for our domain. Here’s the command you can use to run the Certbot container:
docker run -it \
    --rm \
    --name certcont \
    --publish 8888:8888 \
    --volume "/srv/letsencrypt/etc:/etc/letsencrypt" \
    --volume "/srv/letsencrypt/var:/var/lib/letsencrypt" \
    certbot/certbot:latest \
    certonly --standalone -d www.example.com --non-interactive --preferred-challenges http --agree-tos --email admin@example.com --http-01-port=8888
Breaking this down again, there’s some Docker specific stuff first:
--itruns the container in interactive mode, displaying what’s happening on the screen- The name gets set
- Port 8888 is mapped
- Two local directories get mapped to directories within the Certbot container
- The latest Certbot image gets specified
- A command gets specified to run within the Certbot container Then there’s some Certbot specific stuff. The last line in the example is basically a complete command that gets executed within the Certbot container:
certonlyis the Certbot script command to check if a certificate is either present or due for renewal, then request a new certificate if needed--standaloneinstructs Certbot to run a local webserver for domain ownership validation-dspecifies the domain you’re requesting a cert for. The domain should point to your public IP so that your HAProxy VM is reached from Let’s Encrypt validation infrastructure--non-interactivemeans don’t ask questions, just do stuff--preferred-challenges httpsets a preference to listen on port 80 instead of 443 for the requests--agree-tossays that you agree to Let’s Encrypts terms of use--emailsets the e-mail address that any Let’s Encrypt notifications should be sent to. I ran into some strange behavior where the Let’s Encrypt production servers would accept “admin@valid.com” but the staging servers would not, so give this some thought. For more info on the staging servers, read the last entry in this list--http-01-port=8888specifies the local port that Certbot will listen on. Let’s Encrypts infrastructure will still be looking for you on port 80 though, so you need to fix this with a reverse proxy, like we’re doing in this example- Optionally, you can specify the
--stagingparameter which is a particularly good idea if you’re just testing or developing things because Let’s Encrypt applies pretty sharp rate limits on their production systems. The systems meant for staging will be better suited to testing
Now after all this theory, it’s time for a demo:
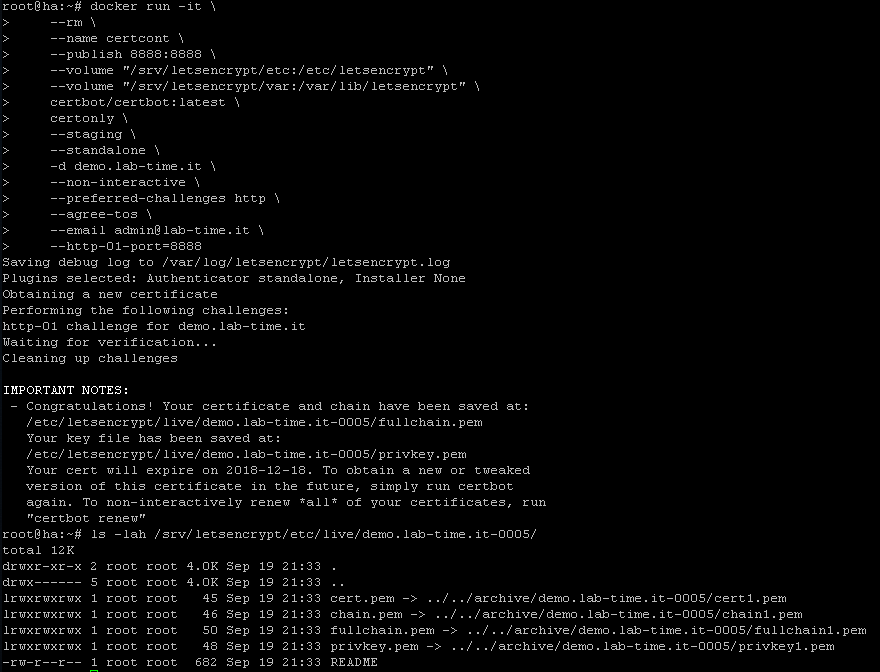
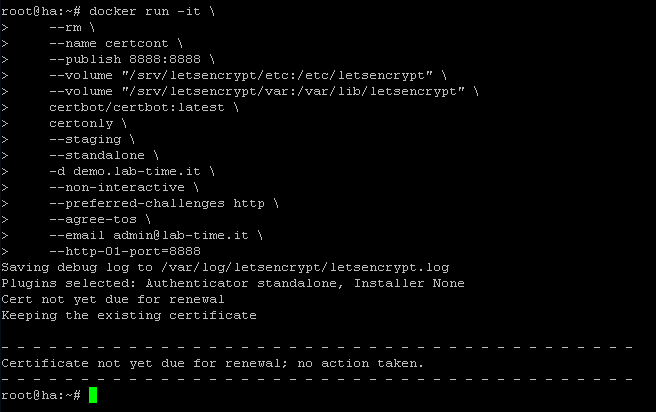
In the screenshot you can see a new cert being requested successfully. Afterwards, you can find the certs and some symlinks to them within the Let’s Encrypt directories. Never mind the number in my directory name, it’s because I’ve been deleting and running things a bit too much while testing for this post. Running the request again does not result in a new cert. By default, your Let’s Encrypt cert will be valid for 90 days. Only requests being run within 30 days of the expiry date will result in a new cert, as can be seen in the screenshot below.
If you got to this stage without any errors, you’re almost there. HAProxy still needs to be told to use the new certificates, and there’s an extra step involved to provide them in a format that HAProxy can work with. Here is the updated configuration for HAProxy:
global
    maxconn 4000
    tune.ssl.default-dh-param 2048

frontend http
    bind *:80
    mode http

    acl letsencrypt-acl path_beg -i /.well-known/acme-challenge/
    http-request redirect scheme https if !letsencrypt-acl
    use_backend letsencrypt if letsencrypt-acl

    timeout client 1h

frontend https
    bind *:443 ssl crt /certs/live/www.example.com/www.example.com.pem
    mode http

    use_backend www.example.com if { ssl_fc_sni -i www.example.com }
    default_backend www.example.com
    timeout client 1h

backend letsencrypt
    mode http
    server letsencrypt 10.12.10.1:8888
    timeout connect 1h
    timeout server 1h

backend www.example.com
    mode http
    server web01 192.168.1.100:80
    timeout connect 1h
    timeout server 1h
A few changes have been made again. First, there is now a http-request rule that redirects any HTTP traffic not matching the Let’s Encrypt ACL to HTTPS. This statement redirects the rest of the connections to the HTTPS frontend. The HTTPS frontend has a default server set along with a use_backend rule. This example points both rules to the same server. I’ve written it like this for demonstration purposes. The use_backend rule actually inspects the Server Name Indicator for the connection and allows you to host different domains on the same IP address. These rules redirect connections to their proper backend and you can add as many as you want. This is where the combination with Let’s Encrypt starts to be fun: host as many websites as you want, all of them with free valid and automatically updated certificates!
With the proper configuration for HAProxy in place, we can see where the newly obtained certificate is supposed to be. The only step left is to actually place the certificate in the right location and in the right format, which we can do with the following command:
cat /srv/letsencrypt/etc/live/www.example.com/fullchain.pem /srv/letsencrypt/etc/live/www.example.com/privkey.pem > /certs/www.example.com/www.example.com.pem
At this moment, you have the required HAProxy configuration and the actual certificate in place, but HAProxy still needs to load the new config. Use the following command to kick the HAProxy container and reload the config:
docker kill -s HUP <container_name>
I don’t think this method is entirely safe for existing connections but I don’t care in my situation so I chose an easy solution. You can do it cleanly but that requires more effort. Please let me know if you have an elegant solution.
Once you have a working environment in place, you’ll want to automate the certificate renewal. A cron job is a good solution. Let’s summarize what needs to be done to get a new certificate running:
- Run Certbot to grab a new certificate
- Use cat to place the cert in the proper place and format for HAProxy
- Reload the HAProxy config
My script can be found in this GitHub repo. It’s named installcert. If you’ve followed along with the rest of this post and you have some basic Linux knowledge, you should be able to adapt my script to your own purposes, or just replicate my solution as it is. There is also a HAProxy config file in the repo that contains some additional config when compared to the examples in this post, to help you to get an A+ rating when testing your TLS setup on SSL Labs.
That’s it for this post. Like always: thank you for reading and please feel free to leave comments or questions.