Comparing Juniper Wistar to Eve-NG
Published on 2018-01-09Wistar is a tool to build virtual labs with Juniper gear. The main attraction is its ability to abstract devices consisting of separate machines in a single node in your topology. Wistar belongs in the realm of software like Eve-NG or GNS3 and brings some unique features to the table. Read on to find out more and see how it compares.
Note that comparing Wistar to Eve-NG isn’t really fair. Eve-NG has gathered quite a user community and development effort, whereas Wistar is still mostly a hobby project of one guy named Nathan Embery. You wouldn’t notice this when using the GUI or reading the documentation, but once you start using Wistar as a platform for lots of labbing, you can run into a couple of things. For the readers of this blog, Eve-NG needs no introduction. For the purpose of this post however, I’ll do a quick recap. The post is divided with general information and pro’s and cons for both platforms, followed by a summary and my personal experiences.
Wistar
Wistar is a tool that you install on a base Ubuntu host (the host itself can be a VM, like with Eve-NG, or bare metal on a dedicated box). You just install the tool, set some stuff up, upload some images and start labbing. The documentation is brief but good. It can be found here on readthedocs.io and here on Github. I also liked the extra information and guide by Robin Gilijamse. As Robin points out, Wistar requires poking the Linux OS a little bit to get the bridges between your VM’s to forward special traffic types like LLDP frames. You also need to hack the kernel if you want or need UKSM (kernel memory deduplication), whereas the Eve-NG appliance already provides this by default.
As stated before, Wistar abstracts the dual images you need to run the most recent Juniper VM’s. This means that both your control plane VM and your PFE VM show up as a single node in your Wistar topology, awesome! Another strong point is the good native support for the vMX, vQFX and vSRX. If you upload the right images, the Wistar GUI allows you to select the control plane image first, and then the corresponding PFE image. All this is made pretty clear in Wistar, and that’s good. Another strong point is that cloud-init is used to automatically set stuff up for you. Each node gets a root account with a password you provide. You also get a management interface set up for SSH access with the root account and your password. From the Wistar VM, you can access all your nodes via SSH. The other option is to click on the node to open a new tab. This gives you console access to the node via a VNC shell in your browser.
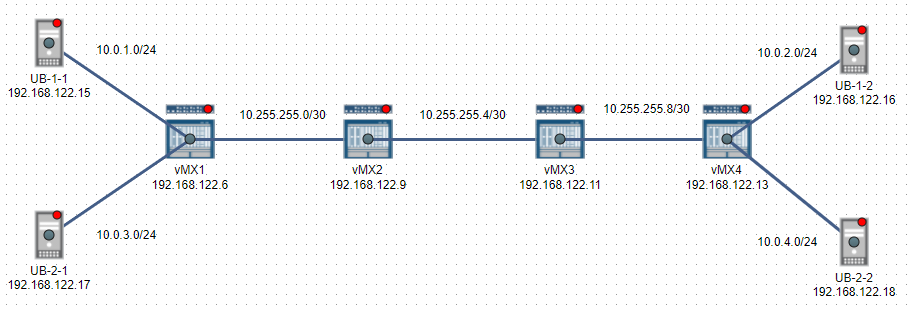
Using both Juniper and Linux (ubuntu) VM’s is pretty easy in Wistar. The Ubuntu VM’s can also be set up with cloud-init. Having a full Linux OS in your networking labs provides some pretty powerful capabilities, so the fact that Wistar makes this easy is something to enjoy. I used Ubuntu 16.04 cloud images. For my first run with Wistar I built the cool MPLS 101 lab by Jon Langemak. The two extra hosts in my screenshot are for a future test with separation using routing instances. In the screenshot, you can see the addresses used for the SSH connections under the nodes. The subnets are labels I added for reference. I like to document in great detail in my topologies and have to note that Eve-NG makes this a little easier.
One thing I missed is the ability to easily view packet captures. You can of course sniff things on the bridges used to connect the nodes together. This should be done by using something like tcpdump directly on the Wistar host. It’s not as nice as clicking capture in Eve-NG and having the packets duplicated straight to your local Wireshark.
Wistar provides a GUI interface to some of the hypervisor functions. Everything that is deployed (instances for control planes and PFE’s, network bridges) is shown in the GUI, and you get power control buttons for each item. I did run into some odd behaviour when I gave a node a shutdown from the nodes' own shell. Wistar didn’t quite understand what was going on anymore and I ended up having to reboot the entire Wistar host to fix it. This might also be my ignorance about some of the KVM details. My workaround now is to exclusively use the GUI power buttons and I haven’t had this problem anymore.
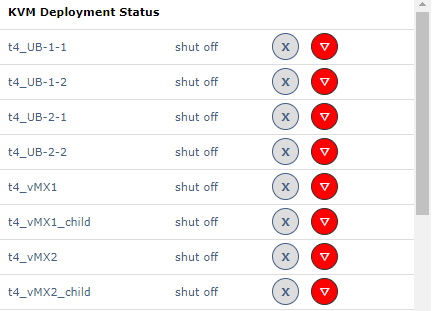
When you want to build a lab, you deploy a new lab in the GUI, add nodes and connections, click on save and on deploy. One annoyance I have with the GUI is that I can’t quickly glance which interfaces numbers are used for connections. If you add a double link between two nodes, you don’t even see two separate lines. You have to click on the node to get your information from the overview and see which interface connects to which nodes. If you want to know both sides of a link, you have to repeat the process. Even doing this, there is no way to tell with for certain if ge-0/0/0 on vMX1 connects to Ge-0/0/10 or to ge-0/0/1 on vMX2. Clicking deploy starts the setup process of the underlying KVM stuff. If you start using the lab and want to add some extra stuff, you have to deploy again. You might need to reboot the nodes to be able to do this. The KVM control stuff looks like this:
Mind that running Juniper VM’s can require a substantial amount of physical resources. With the vQFX, it is recommended to have at least one physical core per node. With the vMX and the vSRX, there can be a big variance in performance, resource usage and boot time depending on the VM versions you use. I have had good results with vMX 15.1F4.15. I haven’t tried the vQFX and the vSRX yet, but I have heard about good results with vQFX version 15.1X53-D60 combined with PFE version 20160609-2 and vSRX versions 15.1X49-D60.7 and 17.3R1.10.
On the topic of resource usage, it should be said that in contrast to Eve-NG, Wistar does not employ linked clones. Each VM is deployed fully independent. This has implications for your resource usage. After building just a couple of labs, I found I wanted to extend my disk to about 75 GB to store some more. Deleting a lab frees up the disk space on the Wistar host. If you want to view disk utilization, use the command “df -h”.
Wistar pro’s
- Abstraction layer for running multi-instance Juniper VM’s
- Good support for recent Juniper images
- Easy running of Linux guests
- Viable option to build complex labs for testing or learning
- Usage of cloud-init
Wistar cons
- Disk space required
- No easy access to packet captures
- Modified labs require redeploy, possibly including reboots
- Some good stuff like UKSM and forwarding LLDP frames require manual hacks
- Viewing interface connections is tedious
Eve-NG
I won’t go into detail about Eve-NG as much because I’ve extensively explained the basics here and here. Suffice it to say that Eve-NG today is at least a fully capable alternative to GNS3, if not preferred over it by more and more people. The biggest attraction to Eve-NG for me is the Web GUI with all its benefits. The GUI is easy to work with and allows me to build nice documented labs. It provides console access via HTML5 using the Guacamole tool or via Putty. You can also easily use Wireshark to sniff any link in your labs.
The support for different images is also really good in Eve-NG. You can run stuff like PfSense, FortiGate, Linux distro’s, Palo Alto, Juniper and Cisco, just to name a few. You can even run nested ESXi hypervisors if you want. It’s also possible to make your own template and see if you can run other x86 based machines. I’ve yet to achieve success doing it though, my previous attempt to create an OpenBSD image didn’t go so well. Working with images in Eve-NG, there’s one downside compared to Wistar: there is no option to abstract multiple machines into a single node. This creates more work for you and more complexity. Also, when building bigger labs, you might have some boring grunt work setting up all of your interface configs etc. Compared to Wistar, it’s not as easy to push this effort away to some cloud-init system.
Eve-NG pro’s
- Easy and powerful Web GUI
- Support for lots of images
- Serious development effort
- Bigger user community
- Easier to deploy, modify and store lots of labs
- Some good stuff like UKSM and forwarding LLDP frames is provided by default
Eve-NG cons
- No abstraction of multi-machine nodes
- Less powerful init capabilities
Summary
All things considered, Eve-NG is the more powerful platform, with its serious development effort and growing user community. After starting to study for Juniper certs using Wistar, the required storage capacity got me. I build most of my labs on a laptop that is constrained to 256 GB on the SSD. I also missed the ability to easily view some protocol stuff and do some troubleshooting with Wireshark. Wistar does fit a specific use case though. If you need to build labs to test a lot of Juniper-specific stuff for example using the vQFX, Wistar is a bit easier to work with. For that use, it’s probably better to have a dedicated server with a decent amount of cores, RAM and storage. If you build less separate labs, just a couple of bigger ones, some of the advantages of Eve-NG over Wistar don’t matter as much. For my own efforts in the near future I’m sticking with Eve-NG. I like to build quick, small labs when studying different topics and the workflow with Eve-NG is just faster right now.