Building A Network Automation Lab
Published on 2018-09-22While preparing to dive into Ansible and Nornir a lot more, I decided to set up a good lab environment. Making use of Eve-NG and some well-known Linux tools, you can build whatever you need. I’ve built a simple topology based on Cisco for switching and Juniper for routing, to try out any automation tool I choose. Read on to find out more.
For practicing different network automation skills, I’ve had the idea for a while already to build some kind of multi-vendor lab network, then connect that lab to a management server. I finally got around to actually building it. Besides the multi-vendor part, I was curious if I could leverage Docker for the automation tools. The plan is to look at Ansible and Nornir mostly, but I’ve still tried to keep things generic enough so I can swap different parts. Also, running a routing protocol between the lab network and the management server was a requirement.
I’m using Git as well, but that’s not really necessary to make use of the rest of this setup. My Git server of choice is Gitea, because GitLab is a little heavy on resource usage for home labs. You can make use of hosted Git repo’s too, but I like the possibility of keeping some private repo’s for free.
Components
The whole setup consists of a few high level components and some more low level components. To readers of my blog, it is obvious that my networking lab environment is based on Eve-NG. Within Eve-NG, I have Cisco switches in use for L2 features mainly, and Juniper routers for L3 features.
The management part is a Linux box (Debian 9.5) with Docker being used to provide the automation tools. For routing, I chose BIRD. Free Range Routing and ExaBGP are also possible. I’ve understood ExaBGP to be pretty complex though. Free Range Routing is also a very interesting choice, and not a bad one to have some exposure to for network engineers either because it’s used by Cumulus nowadays. I sticked with BIRD because of its reputation and because I read the documentation and like the philosophy.
When you have the networking lab and the management server, you need to make sure they can talk to each other. I just bridged one of the lab routers to the same local VLAN as the management server, thanks to Eve-NG. You might extend this idea with a route-based VPN from one of the lab routers to the management server.
Building the actual lab
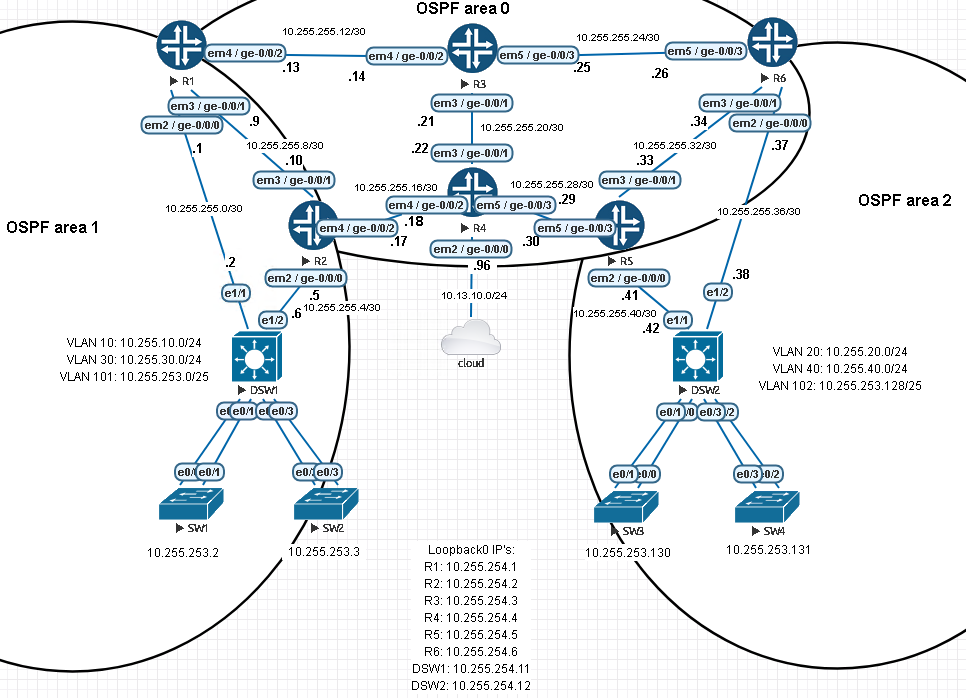
Like I said before, this lab runs Cisco and Juniper. It’s easy to see the difference: every device with a round shape runs Juniper vMX (version vmx-14.1R4.8). Every other device runs Cisco IOL (version i86bi_linux_l2-adventerprisek9-ms.nov3_2015_high_iron.bin). I settled on this IOL version because other versions I’ve tried gave me crap like broken RSTP or broken SSH. This version only treats me with broken ARP behavior: for some reason ARP entries for the L2 switches on the far ends are forgotten and not learned again. The SVI’s of those only become reachable again when trying to ping them directly in local bridge domain, from the distribution switches in this case. I solved this with some static ARP entries so I can move on.
OSPF is used for routing. The 6 vMX routers are in the backbone area (0). The network that has the switches on the left is connected in area 1, the network on the right is in area 2. Area’s 1 and 2 are stub area’s, so the internal devices only learn a default route. In the switch networks, VLAN’s 101 and 102 are used for management of the pure L2 switches. All other devices use a loopback address for management.
This topology gets bridged into my lab network via interface ge-0/0/0 on R4. Via the bridge, displayed as a cloud, the rest of the lab network can be reached.
Building a management box
With the lab up and running, the next thing needed is some kind of management server that you can run the automation tools on. I’ll use a box that’s set up like I described in these two posts on Packet Pushers. Any scripts or tools I want to run are put on this management box, then executed in a Docker container. My management server runs Debian 9.5, but if you decide to use a similar solution, any platform that runs Docker should work.
You can build your scripts and playbooks right on the server using nano or vi. You can also use an IDE (Visual Studio Code Community is a nice one) on another box for development, then put your material on the management server for execution. This can get tiresome, so using Git is not a bad idea. Personally, I also like the option to make minor fixes straight in the GUI of the Git server (systems like GitLab and Gitea offer this feature, similar to GitHub).
Tying things together
At this point, because of the bridge from Eve-NG to the rest of the lab network, R4 should already be able to reach the management server. After verifying this (just ping from one box to the other), it’s time to set up some routing. Debian has a package for BIRD available and you can install it like this:
apt install bird
When BIRD is installed, you’ll find the config files under /etc/bird/. I edited bird.conf and used this basic configuration:
router id 10.13.10.199;
log syslog all;

protocol device {
        scan time 10;           # Scan interfaces every 10 seconds
}

protocol kernel {
        scan time 20;   # Scan kernel routing table every 20 seconds
        metric 64;      # Use explicit kernel route metric to avoid collisions
                        # with non-BIRD routes in the kernel routing table
        persist;        # Don't remove routes on BIRD shutdown
        import none;    # Don't import kernel routes into BIRD
        export all;     # Actually insert routes into the kernel routing table
}

protocol bgp {
        import all;     # Import all BGP routes into BIRD
        export none;    # Don't import BIRD routes into BGP

        local as 1337;
        neighbor 10.13.10.96 as 7331;
}
BIRD keeps its own routing table or multiple tables if you want. When you use BIRD to run daemons for different routing protocols, you apply configuration to decide which routes get installed into the routing table. You can then instruct BIRD to install routes from its own routing table into the kernel of the management server, making them available for the server to use. If you need it, this can work the other way too, for installing routes that the kernel knows into BIRD. Reload the bird daemon after applying the required configuration:
service bird restart
Next up is the required routing configuration on R4. Note that this is just for the BGP peering, the redistribution with OSPF is left out as you should customize that part for your own lab.
routing-options {
    router-id 10.255.254.4;
    autonomous-system 7331;
}
protocols {
    bgp {
        local-as 7331;
        group lab {
            local-address 10.13.10.96;
            family inet {
                unicast;
            }
            neighbor 10.13.10.199 {
                export [ docker-export-ospf docker-export-local ];
                peer-as 1337;
            }
        }
    }
}
policy-options {
    policy-statement docker-export-local {
        from protocol direct;
        then accept;
    }
    policy-statement docker-export-ospf {
        from protocol ospf;
        then accept;
    }
}
In the config above, a router-id (the same as the loopback IP of this router) and a local AS number are set at the top. At the bottom, two policies are defined. The first is an export policy for networks that are locally known. The second is an export policy for networks that this router learned via OSPF. The OSPF configuration itself was omitted here. Under the BGP section, the local AS and a group are provided. The group contains directives that are needed to confige BGP for IPv4 participation. Besides that, a neighbor is configured. Under the neighbor config, the remote AS number is provided and both export policies are applied, making sure the management server will learn all routes that R4 knows about.
And now for the cool stuff, the management box has learned the routes:
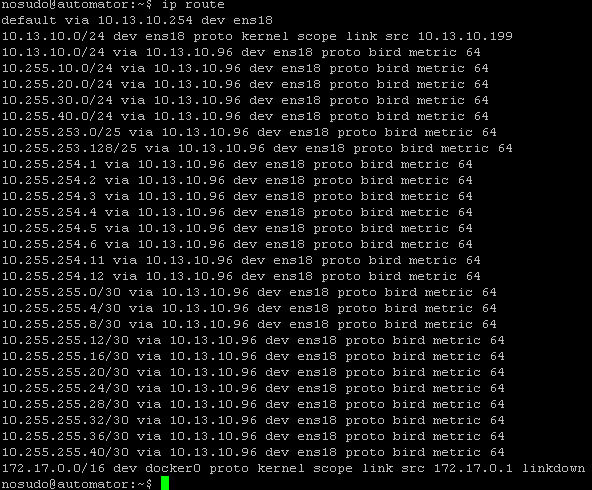
Note that the local lab subnet (10.13.10.0/24) is now known twice. The first time because it’s the actual subnet of the NIC of the management server. The second time because BIRD installs a route to this subnet too. I could fix this but I didn’t bother since the interface route will take preference anyway.
It needs to be mentioned that you could solve the reachability requirement more easily. If you’re smart about the subnets you choose to use in the lab, you can make do with a single static route. To do so, make sure every device in the lab falls within the same supernet, then just point a route on the management box for the entire supernet to the router that has the external interface. Why did I make things so hard? Mostly just to add some more cool technologies to try. One benefit over the static route option is flexibility: random subnets (that don’t conflict with other subnets already present elsewhere) can now be added to the lab topology without any added effort.
Conclusion
Like always, researching all of the subjects cost quite some time. There were a lot of topics to read about and experiment with. Designing and building also takes time. It was definitely worth it though, because I now have a setup that will serve my next study topics. I hope that readers who are looking for something similar can save some time after reading this. If you’re missing something or have questions, please let me know.